Friday, October 26, 2012

Pumpkin Seeds

So as promised in my pumpkin planters post  (I know, I know,  you've been on the edge of your seats waiting) - here is my recipe for roasted pumpkin seeds

I've never been one tradionally to roast pumpkin seeds, they've never been my first snack of choice, and as Chris says "they taste like you're eating seeds" (hmm I wonder why?), but when I was making my pumpkin planters, the pumpkins had TONS of seeds and so I figured I'd try my hand at roasting some up.

What you'll need: Pumpkin/seeds, seasoned salt, butter - or you can use cinnamon and sugar and butter (I made both)

Step 1: Pre-heat oven to 300 degrees, and line a baking sheet with foil

Step 2: pull all the globs of grossness out of your pumpkin, try your best to separate the seeds from rest of the mush put in a strainer and rinse


Step 3: Place seeds on paper towel and pat dry

Step 4: Melt 2 tbsp. butter - add a couple shakes of seasoned salt (or cinnamon sugar) and stir together


 Step 5: Put seeds in plastic bag and pour in butter mixture


Step 5: Shake to coat seeds


Step 6: Spread the seeds in a single layer on baking sheet - I added a few more shakes of seasoned salt (or cinnamon sugar) on top 

Step 7:  Bake for about 45 minutes (or until golden brown and delicious looking) - stir seeds around about half way through 


Step 8: Let cool for a few minutes (or as long as you can resist b/c these puppies smell GOOOOOD)!

Step 9: ENJOY!


I was addicted! And like I said, I normally don't love pumpkin seeds. Must be the butter...

Also, I'd like to thank Shannon for all her assistance with this recipe


Wednesday, October 24, 2012

HAPPY HUMP DAY!!!


Could totally see Parker LOVING this!!!


 (Thanks to my good friend Sheila for sending me this hilarious doodle pic!)

Fear

As a kid I was pretty fearless, I wasn't afraid to try new things, wasn't afraid of heights, needles or spiders.... one family vacation at Club Med I even braved a flying trapeze.

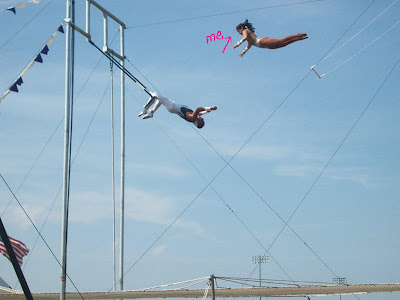
Okay, so maybe I was afraid to let go of the bar, but still, at 7 that's pretty ballsy

But as I've gotten older, I realize that I a: have acquired several irrational fears and/or b: I have a wild imagination. 
Some of these fears include getting trapped in a bathroom (shout out to my good friends who recognize this fear and stand in front of the door so I don't have to lock it), getting stuck in an elevator (b/c ya know, I could plummit to my death or get really really thirsty or have to go to the bathroom or something before I get out), getting trapped in a subway/metro (yeah b/c I ride Subways ALL the time, so this is pretty practical) and more recently fear for my dogs life while I'm away.

I'm starting to think I shouldn't have children, because if I freak out about what my dog is doing while I'm gone, how much am I going to worry about my kid.
Here is where my wild imagination comes into play. Today I asked my bestie Allison if she has these same fears about her dog, she said "oh yeah, I'm so afraid Boags is going to chew up my leather sofa while im at work" - these aren't the same fears that I share. In my mind today Parker is at home bleeding out. I'm pretty sure I left a really sharp knife drying on a dishcloth on the counter (this part is true), and inevitably Parker is going to jump on the counter to check for food (most likely NOT true), pull the rag down and be stabbed by said knife (HIGHLY unlikely), and since Chris and I are away all day, we won't be able to save him in time. RIP little buddy. (HA! time to check in the psych ward)

Totally getting one of these for Parker one day .... only life size
Let me be totally clear though (so you don't think I'm completely nuts), I do not have these fears daily, and they're not always this extreme... sometimes my fear is as simple as I forgot to give Parker his breakfast (which has happened, so I wouldn't call that completely irrational), or I forgot to lock the door.

I guess as we get older we just realize that we aren't invincible, life is precious, and it would really suck to lose an hour of our precious time stuck in an elevator (c'mon cherie berry, keep these elevators up to code!). Also, sometimes fear can lead to appreciation - when I get home and see Parker hasn't been wounded or starved, I am SO happy, when that bathroom door swings open without a hitch, the sun shines a little brighter. So I'll look at my fears as a good not totally crazy thing, its keeping me on my toes, and reminds me how lucky I really am.
Reality: I've probably  just gotten a little more crazy, but hey! crazy can be a good thing... right?!

Thursday, October 18, 2012

Well its been quite a busy week/2 weeks. Furniture Market is finally over! As fun as the hustle and bustle can be, its also utterly exhausting! I can't wait for a weekend of relaxation and clearing off my DVR, I have missed so many of my favorite shows and really would like to put on some sweatpants, eat some cookie dough and catch up. I also missed the presidential debate this week. As much as I like knowing where each candidate stands on the issues I just can not handle the tension. I get SUPER uncomfortable watching these debates and hearing the sass these men throw at each other. So instead of becoming an informed citizen, I'll watch a version of the debates that are a little more my speed:


Monday, October 8, 2012

Pumpkin Planters

This weekend one of my best friends Shannon came to town. Every year I have made it a tradition to drag her around to various pumpkin patches looking for the perfect pumpkins for one project or another. This year I wasn't searching for anything specific but would hate to break tradition, so I took her with me to pick up a few pumpkins, knowing that I'd come up with something to do with them. 

After last weekends landscaping project we had a few leftover mums and I'm too cheap to buy a planter for flowers that I will inevitably kill so I decided to make my own planter using a few of my new pumpkins.

Step 1: Draw a circle along the top of your pumpkin which will be the opening for your flowers


Step 2: Scrape out the insides. Most people would put some newspaper down or something, but im lazy didn't have a newspaper, so I just let it get all over my counters. Oh well. (I saved the pumpkin seeds for a delicious recipe that I'll share later.)


Step 3: Rinse the goo off the pumpkin and flip over. Then either drill or hammer some holes into the bottom, this will allow for drainage when you water your flowers.


Step 4: Fill with soil and flowers


 Step 5: Rinse soil off of the sides, and place wherever you want! 


I made 2, one for my front yard and one for the bistro table in the back.
I love them, and think I can officially say my house is pimped out for Fall! 


Friday, October 5, 2012


DIY Miracle Stain Remover

I post these pictures at the risk of many of you thinking I'm nasty, but the results of this DIY stain remover are just too good not to share. So instead of judging, just say thank you!

What you'll need: 2 tablespoons baking soda, 3 tablespoons hydrogen peroxide, 4 squirts dish soap


Mix them all together into a paste... I was nervous b/c my dish soap was green and was afraid it might make a difference but it worked just fine!


 Now here is where you're going to think I'm nasty, but lets not pretend I'm alone here. Take a stained piece of clothing (you can use this on colors too)

Set in sweat stains, impossible to get out


Use an old toothbrush (or dish brush, or whatever you have lying around), and rub it into the stain

Okay, I'm judging myself. That's gross

Let sit for 45 minutes, and then throw into the laundry like normal.


TADA!!!!! It looks SO much better! And now you don't have to think I'm nasty.

Wednesday, October 3, 2012

"Crack Bark"


"Crack" Chocolate & Caramel Pretzel Bark

Ingredients:
2 Sticks Butter (what recipe is complete without butter)
1 Cup Brown Sugar
1/2 Bag Mini Pretzels
1 Bag Chocolate Chips (for happiness)
Sea Salt

Preheat your oven to 350. Line a cookie sheet with aluminum foil and cover with a single layer of pretzels. Melt two sticks of butter in a small saucepan. In a medium saucepan, melt the butter and the brown sugar until the sugar is dissolved. Let it boil gently just until it starts to stick to the bottom and it forms a nice smooth caramel. You’ll want to let it bubble a little and get really thick (to the point you think you've messed it up.) Pour caramel over pretzels and bake for 5ish minutes. Remove from oven and immediately sprinkle chocolate chips on top. The heat will melt them (or you can place back in the oven for a little melting help,) then use a spatula to spread them around. Sprinkle with as much sea salt as your heart desires. Cool a bit on the counter. Then pop into the freezer for an hour or until you remember it's in there. Break apart into bite sized pieces. Slip into some sweat pants and enjoy!
This weekend was quite productive! Saturday morning we got up bright and early (not MY choice) and took my car to the shop to get  an oil change, inspection, tire rotation and alignment. After I got done throwing $100 in the trash can (I mean c'mon, is car maintenance REALLY necessary?) we headed to Lowe's and bought some flowers to spruce up our yard a little bit. Our HOA provides SOME plants, but not enough to keep our yard from looking like its been abandoned. So, we filled our cart with some fall mums and headed home. 


Despite the fact that it was raining, I put Chris to work (while I took pictures of him)


He ended up transplanting one of the bigger bushes into the middle of the yard to fill in the space a little bit and give the area a little more balance. The pop of yellow really makes a big difference, and for only $15 I think the yard looks a lot better. In just 3 days the flowers have already bloomed a lot and look even prettier!  We're not completely finished on the landscaping front, but definitely making strides towards making our house look like someone lives there. (Side note: I know NOTHING about flowers, so when these suckers die in a few days, I really won't be surprised, I'll just enjoy them for now)


While Chris was slaving away digging holes and getting rained on, I wasn't completely unproductive. I filled in our window box that used to have herbs in it with some fall colored mums


 added some flowers to our planter that housed a sad looking holly bush 

AND made a fall wreath for our front door


Things are looking better around our house slowly but surely. Although, you won't find us working in the yard this weekend, we'll be too busy stuffing our face with fried butter and funnel cakes at the Dixie Classic Fair! Can't wait!

Monday, October 1, 2012

Boot Scootin' Boogie

Fall is here, and pretty much every outfit in my closet would look "cutesie" (Chris's words, not mine) with a great pair of camel colored boots. Every single one of my friends has this staple item in their wardrobe, and here I am, left out to dry with a pair of stretched out smelly ballet flats from last season. That's just NOT going to cut it this year.
So, what do I do? Online shop during work hours and build imaginary shopping carts full of all the fabulous fall outfits and beautiful boots that I could ever desire. What is the reality of this situation? I never proceed to checkout. Who am I kidding anyways? I feel guilty when I buy a $16 pair of pants from Tar-Jay.

But lets just pretend for a minute that I have a wealthy benefactor filling my bank account...

Hello, lover!!!
Meet my friend Morgen
Only $214, I'm a bargain shopper, what can I say - HA!


Too bad I DON'T have a benefactor, and too bad Chris's car needs new tires shoes more than I do. So for now,  I'll be sitting here playing make believe.


**Update - blogs work! Chris bought me some boots! He even picked them out himself, and I love them!  I'm a lucky girl! (and now all of my outfits are totally "cutesie") Thanks babe!**

"EAT" DIY Anthropolgie Inspired Zinc Letters


So by now we've probably ALL seen this project on Pinterest or another blog, but this is my version so  I'll post about it anyways. 
Lately, I've been looking for ways to accessorize my home and give it some personality. I love the look of the Anthropolgie zinc letters, but I'm cheap and would not pay $18 per letter, just to stick them above my cabinets where they will essentially just collect dust. So during my time scouring pinterest, I ran across the DIY version of these letters and figured I'd give it a whirl. 
I went to Hobby Lobby and each of the paper mache letters were 30% off of $2.47 making all 3 cost just $5.

So I started with the bare letters and laid them out on a paper bag on my wet lawn.


I then used some Rustoleum Satin Nickel Metallic Spray Paint that we had leftover from a cabinet hardware project (I'll share that later.)


I then gave each side a couple good coats. Id like to say that each coat was sprayed evenly and that I waited patiently for each coat to dry, but I did not, I'm impatient, and told myself that the globs of paint in certain areas would give it a more legit metal appearance. Of course, nothing is ever easy and since this was leftover spray paint, I ran out in the middle of the project and had to go to Home Depot for a new can.


I then let the letters dry just long enough to not stick to the counters thoroughly, and placed them above my kitchen cabinets.


Overall I'm pretty happy with how they turned out, especially for a project that only cost about $12 total.  However, because they are high up, and I'm not 6'4 like my husband, I can sometimes only see the top part of the letters and the word "FAT" stares down at me. Maybe this was the best addition to my kitchen that I could have ever thought of, lets see if any weight loss occurs. Doubt it, but I'll keep you posted.